|
Dried Plaice (Northern Jutland, Denmark)
Submitted by:
Inge Bødker Enghoff,
Zoological Museum, Denmark
Butchery and Ethnographic Info:
This recipe is modified for use in modern households. Originally, the purpose of drying plaice was to secure a food reserve for the winter and other periods of poor fishing. The fish was salted for a longer period, such that they became saturated with salt (bomsaltning), dried on a special rack (hjeld) made of tree stakes and horizontal and vertical strings, and stored in an absolutely dry place. Humidity would quickly spoil the dried fish. Before cooking the fish had to be steeped for a longer period. Use freshly caught plaice, preferably just under 27cm (8) in total length. 27cm plaice are used because they are the minimum size, larger plaice would be reserved for selling.
Instructions:
Cleaning:
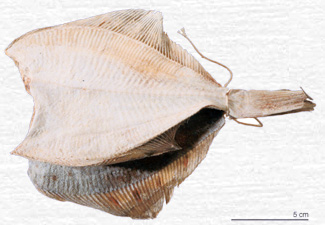
First cut off the head, including the gills. With some practice, the entrails can be removed together with the head and one only has to clean blood away from the body cavity. Make an incision in one side of the root of the tail, same side on all the fish (for tying, see below).
Salting:
Cover the bottom of a suitably sized bowl with fine-grained salt. Place one layer of cleaned fish in the bowl and sprinkle a thin but complete layer of salt over the fish. Repeat alternating layers of salt and fish until the last layer of fish is complete. Cover the top layer of fish with a thicker layer of salt. (The salt in the top layer will in part dissipate to the lower layers during the process.) Let stand for two days. Bigger fish must be salted for a longer period.
Rinse the fish lightly, not thoroughly, in water. Tie the fish together in pairs around the tails, eyesides facing such that there is an incision on each side of the pair of tails; fit the string around the tail roots and into the incisions (see above Photo). The incisions prevent the string from slipping off when the fish shrink from drying. To avoid flies, which will inevitably try to lay their eggs in the fish, place a good sprinkle of pepper in the body cavity and seal the opening of the body cavity with a strip of paper (e.g., greaseproof paper/ butcher paper). If the fish is still wet and slimy as it should be, the paper will easily stick to the surface and make a complete seal. Complete the tying together, peppering, and sealing of each pair before moving on to the next.
Drying:
Hang the fish outdoors on a thick string during a dry, windy period. Dry wind is better than too much sun, which tends to fry the fish. Place each pair astride on the string and displace the two fish of the pair laterally to facilitate access of air. This is also the reason the hanging string should be thick. (Air needs to circulate on all sides of each fish). The fish must be taken indoors each day before the fall of dew and also during rainy weather. The fish is ready when it is completely dry, i.e., bone hard without a single soft spot. In perfect drying weather, this takes three or four days, otherwise longer. If you have a flagpole it is a good idea to hoist the fish up because flies rarely fly this high.
The dried fish can be stored in the freezer, packed in plastic bags.
Ingredients:
- Dried plaice
-
50g butter
-
2 big onions, sliced thin
-
2 2.5 tbsp flour
-
Approx. 4 dl milk
-
Salt
Instructions:
Cut off the fins. Remove the skin on both sides. Steep for six hours. Put plaice in cold fresh water; bring to a boil, let boil for 20-25 minutes. If the fish is still too salty, re-boil in fresh water.
For the sauce: Boil onions in a small amount of water. Add butter and flour and combine well, then add milk slowly. Heat thoroughly, but do not boil, and season with salt.
Serve fish with boiled potatoes and onion sauce.
|